The Progressive Focus Method For Painting a Portrait In Oils
By William F. Martin
For years I struggled, attempting to paint a portrait that displayed a relatively accurate likeness of the subject. I tried gridding, sketching, accurate drawing, using “classic proportions”, etc., etc. However, all these methods resulted in rather stilted, and stiff representations of the subject, with a likeness that left a great deal to be desired.
Then, I rather stumbled upon the method that I use now, and when I first tried the method, I experienced immediate success (if success can be defined as achieving a likeness of the subject being painted). I call this method “The Progressive Focus Method” for painting a portrait, and the method employs no preliminary drawing, or sketching, whatsoever, but merely painting that which I see.
The method follows some sound, artistic principles, some of which are to paint “shapes”, instead of “things”, and to begin “general”, and work toward the “specific”.
I always work from a prepared reference photo that is in exact proportion to the dimensions of the canvas. For example, a 16” x 20” canvas will require an 8” x10” reference photo. I prepare 3 reference photos in Photoshop—sometimes 4.
The first photo is a normal,sharp-focus photograph. Once cropped, sized, and color-corrected, I print this out. The second photo is a slightly blurred version. I blur this in Photoshop, using the Gaussian Blur tool, and I print out this photo, as well.
The third photo is a greatly blurred version—so blurred that you can hardly tell that it is a human being, at all, but just an array of interesting, abstract shapes and colors.
I begin by applying paint to the canvas, using the first, greatly-blurred, reference photo, and I will generally use it placed upside-down alongside my easel. This has the effect of keeping my mind concentrated on achieving “shapes” as I paint along, trying to match it precisely. At this stage, I would know recognize an “eye” from a “nose”.
By following the reference photos,and matching the locations of the various, abstract shapes, I am able to get the elements of the features in their correct locations early on in the process of applying paint. Once the roughing-in of the general, abstract shapes is completed, I progress through the next two (or three, in some cases) reference photos, coming to end with the normal, sharp-focused photograph, during which time I add the finishing touches to all those elements (features) which are already in their proper locations.
Here are some photos that show my stages. In each case the reference photo is shown at the right,while the painting is on the left. Being a “leftie” I always place my reference on the right side of my painting.
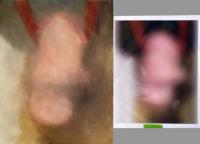
I usually begin my painting by orienting the greatly-blurred reference photo upside-down. Sorry…. the swirls that are apparent on the photo are reflections off of the clear, plastic covering, and they are NOT part of the photo.
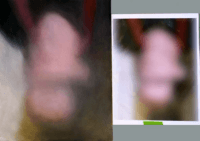
More refining on the greatly-blurred image, attempting to get all the “shapes” correct.

When I feel my underpainting of the greatly blurred photo is close enough to the reference photo, I then move on to the next, not-quite-so-blurred photo.

It is at the stage that I often turn my next, not-quite-so-blurred photo rightside-up.
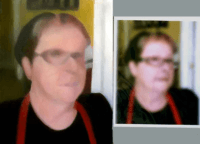
I continue working from this reference photo until I feel that I have done the best I can at arriving at a relatively accurate “match” of the reference photo.

At this stage, I begin working from a relatively sharp focus reference photo, doing my best to match what I see. It is rather easy to do, because I was able to have placed the important elements (features) in their correct places early on,when they actually didn’t appear to be much of anything, but strange, abstract shapes.

Here, I am working from my final, normal, sharp-focused reference photo, adding details, and keeping certain areas at a more appropriate blur. That is another advantage of this method. When you decide you need specific areas to be softer ……. they are already accomplished, during an earlier stage.
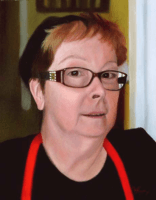
This is the final portrait of Pat Rayner, a friend of mine in whose Coffee Shop I have hung, and sold,several of my paintings. This is an 11” x 14” oil painting on an acrylic-primed hardboard panel. I painted this relatively accurate likeness of this subject using no drawing, and with no preliminary sketching, whatsoever. For my layers I used a medium which included Linseed Oil, Walnut Oil, a natural resin, and using Oil of Spike Lavender as the solvent. At present, Art Treehouse is my primary supplier of all the ingredients that I use in my painting medium. I allowed each layer to dry before applying further paint layers. I gifted this lady this painting for her birthday, and she was delighted with it. The painting hangs overhead in her coffee/chocolate shop just down the street from my house.
I used to experience great difficulty achieving a likeness when painting portraits, until I tried this method. The first time I tried this method I had such great, and immediate success with it, I believed it to be a fluke, so I immediately painted another portrait …. with equal success. Since then, I have quit even trying to create any sort of preliminary drawing, or sketch with pencil, and instead I go directly to the canvas with paint, using my “Progressive Focus Method”.
Give it a try, and I’m sure you will enjoy the method, especially if you typically experience difficulty achieving a likeness of your subject.